Periodontal Instruments
Following are the principles of periodontal instrumentation
- Accessibility
- Visibility, illumination and retraction
- Condition of instruments
- Maintaining a clean field
- Instrument stabilization
- Instrument activation
Periodontal Instruments Accessibility
- It is generally related to the position of the patient and operator.
- It facilitates thoroughness of instrumentation. The position of the patient and operator should provide maximal accessibility to the area of operation.
- Inadequate accessibility impedes thorough instrumentation, prematurely tires the operator, and diminishes his or her effectiveness.
“What Is Periodontal Instrumentation”
Neutral Seated Position for the Clinician Periodontal Instruments
- Forearm parallel to the floor.
- Weight evenly balanced.
- Thighs parallel to the floor.
- Hip angle of 90°.
- Seat height positioned low enough so that the heels of your feet touch the floor.
- When working from clock positions 9–12:00, spread feet apart so that your legs and the chair base form a tripod which creates a stable position.
- Avoid positioning your legs under the back of the patient’s chair.
- Back straight and the head erect.
Periodontal Instruments Patient’s Position
- Patient should be in a supine position and placed in such a way that the mouth is close to the resting elbow of the clinician.
- Body: Patient’s heel should be slightly higher than the tip of his or her nose. The back of the chair should be nearly parallel to the floor for maxillary treatment areas.
- Chair back may be raised slightly for mandibular treatment areas.
- Head: The foremost of the patient’s head should be even with the upper edge of the head rest.
- For mandibular areas–chin down position.
- Maxillary areas-chin up position.
- Head rest: If the head rest is adjustable, it should be raised or lowered, so that the patient’s neck and head are aligned with the torso.
“Principles Of Effective Periodontal Instrumentation”
Visibility, Illumination and Retraction
Periodontal Instruments Visibility
Whenever possible, direct vision with direct illumination from the dental light is most desirable. If this is not possible, indirect vision may be obtained by using a mouth mirror to reflect light where it is needed.
Periodontal Instruments Dental Mirror
It is a hand instrument which has a reflecting mirror surface used to view tooth surfaces that cannot be seen by direct vision.
Periodontal Instruments Transillumination
When transilluminating a tooth, the mirror is used to reflect light through the tooth surface. The transilluminated tooth almost will appear to glow. It is effective only with anterior teeth because they are thin enough to allow the light to pass through them.
- Procedure:
- Step 1: Position yourself in l2 o’ clock position.
- Step 2: Using a modified pen grasp, hold the mirror in the non-dominant hand. Bring the arm up and over the patient’s face. Gently rest your ring finger on the side of the patient’s lip or cheek.
- Step 3: Hold the dental mirror behind the central incisors so that the reflecting surface is parallel to the lingual surface. Position the unit light so that the light beam shines on the dental mirror at a 90° angle to the mirrors reflecting surfaces.
- Step 4: Properly positioned light and the mirror will result in glow.
“Tools Used In Periodontal Instrumentation”
Periodontal Instruments Retraction
Retraction provides visibility, accessibility and illumination. The following methods are effective for retraction:
- Use of the mirror to deflect the cheek while the fingers of the non-operating hand retract the lips and protect the angle of the mouth from irritation by the mirror handle.
- Use of the mirror alone to retract the lips and cheek.
- Use of fingers of the non-operating hand to retract the lips.
- Use of the mirror to retract the tongue.
- Combination of the preceding methods.
Condition of Instruments (Sharpness)
Prior to any instrumentation, all instruments should be inspected to make sure that they are clean, sterile and in good condition. The working ends of pointed or bladed instruments must be sharp to be effective.
- Advantages of sharpness
- Easier calculus removal.
- Improved stroke control.
- Reduced number of strokes.
- Increased patient comfort.
- Reduced clinician fatigue.
Ideally, it is best to sharpen your instruments after autoclaving and then reautoclave them prior to patient treatment. Dull instruments may lead to incomplete calculus removal and unnecessary trauma because of excess force applied.
Maintaining a Clean Field
- Despite good visibility, illumination and retraction, instrumentation can be hampered, if the operative field is obscured by saliva, blood and debris.
- Adequate suction is essential and can be achieved with a saliva ejector or, an aspirator.
- Blood and debris can be removed from the operative field with suction and by wiping or blotting with gauze squares.
- The operative field should also be flushed occasionally with water.
- Compressed air and gauze square can be used to facilitate visual inspection of tooth surfaces just below the gingival margin during instrumentation.
- Retractable tissue can also be deflected away from the tooth by gently packing the edge of gauze square into the pocket with the back of a curette.
“Risk Factors For Improper Periodontal Instrumentation”
Instrument Stabilization
- Stability of the instrument and the hand is the primary requisite for controlled instrumentation. Stability and control is essential for effective instrumentation and to avoid injury to the patient or clinician. The two factors that provide stability are instrument grasp and finger rest.
- Instrument Grasp
- A proper grasp is essential for precise control of movements made during periodontal instrumentation.
- The most effective and stable grasp for all periodontal instruments is modified pen grasp. This grasp allows precise control to the working end, permits a wide range of movements and facilitates good tactile conduction.
- The palm and thumb grasp is useful for stabilizing instruments during sharpening and for manipulating air-water syringes.
Finger Rest
- Finger rest serves to stabilize the hand and the instrument by providing a firm fulcrum, as movements are made to activate the instrument.
- A good finger rest prevents injury and laceration of the gingival and surrounding tissues.
- The ring finger is preferred by most clinicians for the finger rest. Maximal control is achieved when the middle finger is kept between the instrument shank and the fourth finger. This built-up fulcrum is an integral part of the wrist forearm action that activates the powerful working stroke for calculus removal.
- Finger rests may be generally classified as intraoral finger rests or extraoral fulcrums.
- The standard intraoral finger rest generally rest on stable tooth surface immediately adjacent to working area.
- Following are the advanced intraoral finger rests
- Modified intra-oral fulcrum: Achieved by combining an altered modified pen grasp with standard intra-oral fulcrum
- Piggy-backed fulcrum: Middle finger rest on top of ring finger.
- Cross-arched fulcrum: Accomplish by resting a ring finger on tooth on opposite side of arch from teeth being instrumented.
- Opposite arch fulcrum: Accomplished by resting the ring finger on the opposite arch.
- Finger-on-finger fulcrum: Accomplished by resting the ring finger on index finger.
- Basic extraoral fulcrums are
- Palm up technique: Clinician rest the Knuckle against patient’s chin or cheek
- Palm down technique: Clinician cups the patient’s chin with palm of the hand.
“Understanding The Principles Of Periodontal Instrumentation”
Instrument Activation
Following are the points to be considered:
- Adaptation
- Angulation
- Lateral pressure
- Strokes
Adaptation
It refers to the manner in which the working end of a periodontal instrument is placed against the surface of the tooth. The objective of adaptation is to make the working end of the instrument confirm to the contour of the tooth surface.
The cutting edge has three imaginary sections:
- Leading third-used more often during instrumentation.
- Middle third.
- Heel third.
Precise adaptation must be maintained with all instruments to avoid trauma to the soft tissues and root surfaces and to ensure maximum effectiveness of instrumentation. Bladed instruments such as curette and sharp-pointed instruments such as explorers are more difficult to adapt.
“Early Signs Of Effective Periodontal Instrumentation”
Angulation
It refers to the angle between the face of a bladed instrument and the tooth surface.
- For insertion beneath the gingival margin, the face to tooth surface angulation should be an angle between 0 to 40°.
- For calculus removal, angulation should be between 45 to 90°. The exact blade angulation depends on the amount and nature of calculus, the procedure being performed and condition of tissue during scaling or root planning, with angulation of less than 45°, the cutting edge will slide over the calculus smoothening or burnishing it. When gingival curettage is indicated, angulation greater than 90° is deliberately established.
Lateral Pressure
- It refers to the pressure created when force is applied against the surface of a tooth with the cutting edge of a bladed instrument. Exact amount of pressure depends upon the procedure performed. It may be firm, moderate or light when insufficient lateral pressure is applied on rough ledges or lumps may be shaved to thin, smooth sheets of burnished calculus.
- Repeated application of excessively heavy strokes will nick or gouge the root surface. The careful application of varied and controlled amounts of lateral pressure during instrumentation is an integral part of effective scaling and root planning techniques.
“Can Periodontal Instrumentation Treat Deep Pockets”
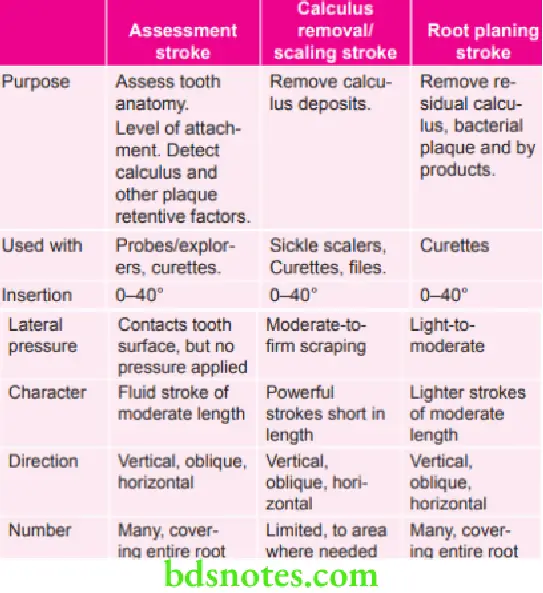
Strokes
There are four types of strokes:
- Placement stroke.
- Exploratory stroke or assessment stroke.
- Scaling stroke.
- Root planning stroke.
The placement stroke is used to position the working end of an instrument apical to a calculus deposit or at the base of a sulcus or pocket.
Leave a Reply