“What is a free gingival graft and how does it work?”
Free Gingival Graft
Free Gingival Graft is also known as epithelial gingival graft or free mucosal autograft.
- Free gingival graft is used to create a wide zone of attached gingiva.
- Secondary objectives are root coverage and vestibular deepening.
Free Gingival Graft Procedure
- Step 1—Inject anesthesia: Adequate anesthesia is injected onto the recipient as well as donor sites.
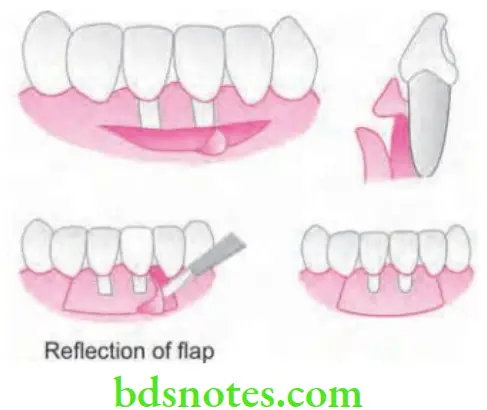
- Step 2—Prepare the recipient site: A firm connective tissue bed is prepared to receive the graft. The recipient site can be prepared by incising at the existing mucogingival junction with a 15 no. blade to the desired depth, blending the incision on both ends with existing mucogingival line. The incision is extended approximately twice the desired width of the attached gingiva which allows for 50% contraction of the graft when healing is complete.
“Understanding the role of free gingival grafts in treating gingival recession”
Insert 15 no. blade along the cut gingival margin, and separate a flap consisting of epithelium and underlying connective tissue without disturbing the periosteum. The recipient bed should be smooth and essentially free of muscle attachment tissue. At this point, gauze square is packed between the wound and the lip or cheek to limit bleeding and promote hemostasis in the recipient area while the donor tissue is being obtained.
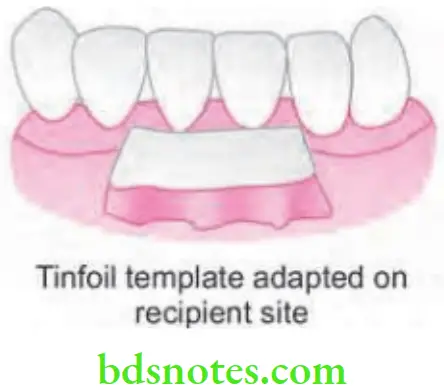
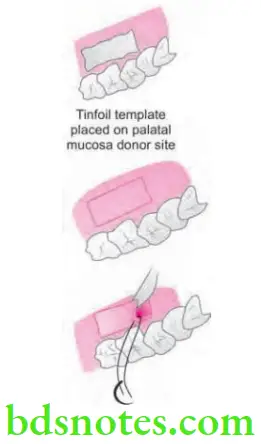
- Step 3—Obtain the graft from the donor site: Donor site may be gingivectomy tissue, an edentulous ridge or the palate. The amount of donor palatal tissue needed can be accurately determined by using a foil template. Place the template over the donor site and make a shallow incision around it with a 15 no. blade. All palatal incisions are made in such a fashion so as to create a butt joint margin at the donor site. Insert the blade to the desired thickness at one edge of the graft. Elevate the edge and hold it with tissue forceps. Continue to separate the graft with the blade, lifting it gently and as separation progresses, visibility increases. A partial thickness graft consisting of epithelium and a thin layer of underlying connective tissue is used. The ideal thickness of the graft is in between 1.0 mm and 1.5 mm. Thinner graft shrivels and exposes the recipient site while thicker graft jeopardizes the circulation and nutrient diffusion.
- Step 4—Transfer and immobilize the graft: Pressure is applied on the recipient site to remove the excess clot as thick clot interferes with vascularization of the graft. Suture the graft at the lateral borders and to the periosteum to secure it in position. The graft should be immobilized because any movement interferes with healing. Avoid excessive tension, which can distort the graft from the underlying surface.
“Importance of studying free gingival grafts and gingival recession classifications”
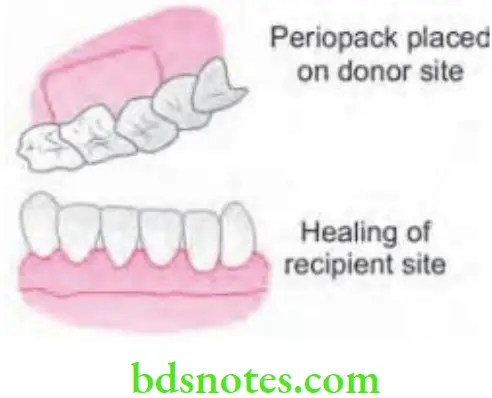
- Step 5—Protect the donor site: Once the graft is free, firm pressure should be applied to the donor site with a gauze square. Cover the donor site with a periodontal pack for one week and repeat if necessary. A modified Hawley retainer is useful to cover the pack on the palate.
- Step 6—Postoperative instructions: Instructions to the patient are most important to the success of the graft. Patient should be advised not to brush at the recipient site for the week. Patient should not retract the lip or cheek to observe the graft. No postoperative factor will facilitate failure in soft-tissue grafting to the degree that smoking does. Smoking causes constriction of capillaries, diminished blood flow to the area, poor oxygenation of tissue causing sloughing of the graft. Thus, patient is instructed to quit smoking immediately preoperatively and abstain for the lst week (preferably for 2 weeks).
- Step 7—Suture removal: Sutures are removed after 7–10 days
Healing of Free Gingival Graft
Healing of free gingival graft takes place in three steps, i.e.
- Stage of plasmatic circulation
- Stage of vascularization
- Stage of maturation
- Initially survival of the graft is by diffusion of nutrients. This is later followed by proliferation of new blood vessels from surrounding areas and establishing a plexus with the vessels which is already present in graft.
- Now this is followed by the maturation as well as functional integration which take place by 3 weeks.
- So healing includes the complete renewal of epithelium. Moreover, for many months, graft is discernable from surrounding areas.
“Common challenges in performing free gingival graft surgery”
Periodontal Plastic Surgery And Classify Gingival Recession
Answer. Periodontal plastic surgery is defined as “the surgical procedures performed to correct or eliminate anatomic, developmental or traumatic deformities of gingival or alveolar mucosa.”
Gingival recession is defined as “exposure of the root surface due to apical shift in marginal gingiva”.
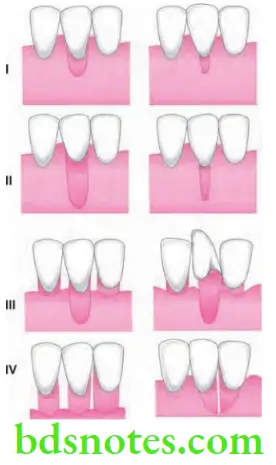
Classification of Gingival Recession
According to Sullivan & Atkins
- Shallow – narrow
- Shallow – wide
- Deep – narrow
- Deep – Wide
“Steps to classify gingival recession using Miller’s classification”
This above mentioned early classification helped to categorize the lesion but did not enable the clinician to predict the outcome of therapy. The predictability of root coverage can be enhanced by the presurgical examination and the correlation of the recession by using the classification proposed by Miller.
According to PD Miller
- Class 1. Marginal tissue recession does not extend to the mucogingival junction. There is no loss of bone or soft tissue in the interdental area. This type of recession can be narrow or wide.
- Class 2. Marginal tissue recession extends to or apical to the mucogingival junction. There is no loss of bone or soft tissue in the interdental area. This type of recession can be sub classified as wide and narrow.
- Class 3. Marginal tissue recession extends to or apical to the mucogingival junction. There is bone and soft tissue loss interdentally or malpositioning of the tooth facially.
- Class 4. Marginal tissue recession extends to or apical to the mucogingival junction. There is severe bone and soft tissue loss interdentally or severe tooth malposition.
“Complications of delaying treatment for gingival recession”
“Role of gingival recession severity in determining treatment options”
Periodontal Plastic and Esthetic Surgery
Answer. Periodontal plastic surgery is defined as “the surgical procedures performed to correct or eliminate anatomic, developmental or traumatic deformities of gingival or alveolar mucosa.” —Carranza
Periodontal aesthetic surgery is defined as surgical procedure which deals with esthetic surgical corrections.
Techniques to Augment Gingiva Apical to Recession
So, following are the procedures to augment gingiva apical to recession:
- Free epithelial or gingival autograft
- Free connective tissue autograft
- Apically positioned flap
- Fenestration
- Vestibular extension.
Free Connective Tissue Autograft
This method is based on the fact that connective tissue carries the genetic message for the overlying epithelium to get keratinized. So, only the connective tissue from keratinized zone is used as a graft.
Apically Positioned Flap
It is used for combining purposes of eliminating pockets and widening the zone of attached gingiva. It either uses full thickness or partial thickness flap to avoid exposure to bone.
Procedure
- Step 1: Internal bevel incision 0.5–1 mm is given from crest of marginal gingiva.
- Step 2: Crevicular incision and inter dental incisions are given
- Step 3: Vertical incisions extend beyond the mucogingival junctions are made so that the flap can be displaced easily. Reflect the flap depending on the purpose.
- Step 4: Debride the area and place the flap apical to its original position and suture.
“How do mild, moderate, and severe gingival recessions differ?”
Fenestration
Fenestration operation utilizes a partial thickness flap, except in rectangular area at base of the operative field where the periosteum is removed, exposing the bone. This is the area of fenestration and its purpose is to create a scar which is firmly bound to bone.
The results obtained are not as predictable as those obtained with the free gingival graft or apically displaced flap.
Vestibular Extension
- The operative field is outlined by two vertical incisions from the junction of the marginal and attached gingiva to approximately 12 mm from the alveolar margin into the vestibule.
- The vertical incisions are joined by horizontal incision.
- A mucosal flap is elevated exposing periosteum on the bone.
- The periosteum is separated starting from the bone, starting from the line of attachment of the mucosal flap.
- The periosteum, including muscle attachments is transported to bone and is sutured to the inner surface of the periosteum.
- The periosteum is then transported to the lip and is sutured where the horizontal incision was made.
Recession Management by Using Free Gingival Graft
- One step procedure
- Classic technique—Sullivan and Atkins 1968
- Two step procedure
- Bermovin et al. 1897.
- Guinard and Coffesse 1975.
- Variant technique procedure
- Strip technique
- Accordion technique
- Combination technique.
“Early warning signs of untreated gingival recession”
Classical Technique
Step 1: Elimination of Pockets
- If pockets are present eliminate them by resection with gingivectomy incision. Also do the scaling and planning of root surfaces.
- If pockets are absent gingival margin should be left intact.
“Global prevalence of gingival recession and its management”
“Asymptomatic vs symptomatic stages of gingival recession progression”
Step 2: Preparation of Recipient Site
There are two techniques for preparation of recipient site:
- First technique: Incise at existing mucogingival junction with No. 15 BP blade to a little more than desired depth and blending the incision over both ends with mucogingival line. Periosteum is left covering the bone.
- Second technique: Recipient site should be outlined by two vertical incisions from cut gingival margin to oral mucosa. Excision should be extended to desired width of attached gingiva. A no. 15 blade is inserted along cut gingival margin and separates a flap consists of connective tissue and epithelium without disturbing periodontium. Flap should be sutured where apical portion of free gingival graft will be located.
- Tin foil template should be adapted at the recipient site.
“Advances in predicting free gingival graft risks using AI”
“Can targeted classification improve treatment outcomes?”
Step 3: Obtaining Graft from Donor Site
- Partial thickness of graft is used, sites from which it is obtained are attached gingiva, masticatory mucosa from edentulous ridge and palatal mucosa.
- Graft should consist of epithelium as well as thin layer of underlying connective tissue.
- Tin foil template should be placed at donor site and a shallow incision is made over it from No. 15 blade.
- Blade is inserted to the optimal thickness at one edge of graft and is elevated by holding with tissue forceps or sutures are placed at margin of graft. Ideal thickness of the graft should be between 1 and 1.5 mm.
- As graft is separated, loose tissue tags are removed from the under surface.
“Pathophysiology of untreated gingival recession explained”
Step 4: Transfer and Immobilization of the Graft
- Remove the excess clot from the recipient site because thick clot interfere with vascularization of graft.
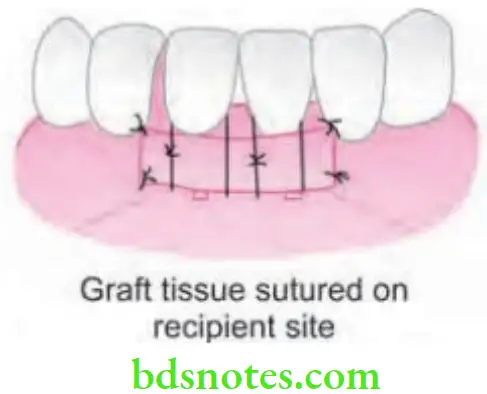
- Graft is immediately transferred to the recipient site and immobilized by suturing to the periosteum of adjacent attached gingiva with adequate number of restorable sutures.
- Exert pressure against the graft for a few min to eliminate thick blood clot between the graft and recipient bed.
Step 5: Protection of the Donor Site
- Cover the donor site with a periodontal pack for 1 week and repeat if necessary.
- Modified Hawley’s retainer is useful to cover the pack on the plate and cover the edentulous ridges.
“Emerging research on advanced free gingival graft techniques”
Variant Technique Procedure
Accordion Technique
Expansion can be achieved by giving alternate incisions on the opposite sides of the graft.
“Case studies on outcomes of free gingival graft surgeries”
Strip Technique
- The strip technique by Han and associates consists of 2 or 3 strips of tissue about 1 mm wide and long enough to cover the entire length of the recipient site.
- These strips are placed at the center and base of the recipient site and sutured from the oral mucosa. The area is then covered with tinfoil and a surgical pack.
Combination Techniques
It can be performed as follows:
- Remove a strip of tissue about 3–4 mm thick from the palate, place it between two wet tongue depressors, and slice it longitudinally with a sharp BP blade.
- Use a superficial portion that contains epithelium and connective tissue, and the deeper portion that only consist of connective tissue.
Leave a Reply