Tracheostomy: Types, Indications, Procedure, And Potential Complications Explained
Describe briefly tracheostomy.
Answer. Tracheostomy refers to a surgical entry into the trachea through the anterior wall to secure the airway for oxygenation.
Tracheostomy Classification/Types
- Depending on the method of initial insertion:
- Surgical
- Percutaneous (needle).
- Depending on the intended duration:
- Temporary tracheostomy
- Permanent tracheostomy.
“The Role Of Tracheostomy In Critical Care Settings”
Read And Learn More: General Surgery Questions and Answers
- Depending on the situation demanding the procedure:
- Emergent tracheostomy
- Urgent tracheostomy
- Elective tracheostomy.
“What Tests Determine The Need For A Tracheostomy“
Tracheostomy Indications
- To secure and clear the airway in upper respiratory tract obstruction (actual or potential).
- To secure and maintain a safe airway in patients with injuries to the face, head, or neck and following certain types of surgery to the head and neck in unstable cervical spine fracture.
- To facilitate the removal of bronchial secretions where there is poor cough effort with sputum retention.
- To protect the airway of patients who are at high risk of aspiration, that i.e., patients with incompetent laryngeal and tongue movement on swallowing, e.,g. neuromuscular disorders, unconsciousness, head injuries, stroke, etc.
- To enable long-term mechanical ventilation of patients, either in an acute ICU setting or sometimes chronically in hospitals.
- To facilitate weaning from artificial ventilation in acute respiratory failure and prolonged ventilation.
Tracheostomy Contraindications
- Children under 5 years of age.
- Preexisting pathology the of larynx, e.g., carcinoma
- Lack of experience and knowledge of cricothyroidotomy.
- Cervical trauma.
“Can Tracheostomy Tubes Be Replaced At Home”
Tracheostomy Procedure
- Step I: Skin from the chin to below the clavicles is sterilely prepared.
- Step II: Local anesthesia with vasoconstrictor is infiltrated into the skin and deeper tissues.
- Step III: The skin of the neck over the second tracheal ring is identified, and an incision is placed horizontally along the natural cervical skin crease.
- Step IV: Sharp dissection following the skin incision is done to cut across the platysma muscle.
- Step V: Blunt dissection is given parallel to the long axis of the trachea for separating submuscular tissues until the isthmus is identified.
- Step VI: A cricoid hook engages the space between the ricoids and the fist tracheal ring, pulling the trachea upward. Blunt dissection is continued longitudinally through pre tracheal fascia.
- Step VII: Entranceinton the trachea
- A linear incision is made through inter-space between the second and third tracheal rings.
- The mid-portion of the third or fourth tracheal ring is removed to create a tracheal window.
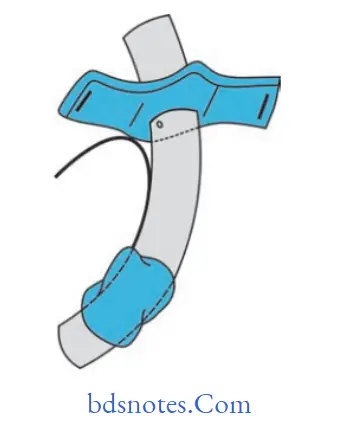
- An inferiorly placed U-shaped flap, also known as a Bjork flap, incorporates the ring below the tracheal incision and is raised and sutured to the skin at the inferior margin.
- Step VIII: The tube is placed and secured to the neck.
The tube is inserted vertically downward into the trachea, avoiding damage to the tracheal mucosa ofthe posterior wall.
The tube is secured by suturing the flanges to the neck skin.
This is followed by tying the flanges of the tube with thread encircling the neck, taking care to avoid strangulation.
“Effective Ways To Manage Tracheostomy Recovery”
Tracheostomy Complications
Complications are as follows:
- Immediate complications (Perioperative period)
- Hemorrhage
- Misplacement of tube
- Pneumothorax
- Tube occlusion.
- Surgical emphysema.
- Loss of the upper airway.
- Delayed complications (Postoperative period; less than 7 days)
- Tube blockage with secretions or blood.
- Partial or complete tube displacement.
- Infection of the stoma site.
- Infection of the bronchial tree (pneumonia).
- Ulceration and/or necrosis of trachea.
“Best Practices For Cleaning And Maintaining A Tracheostomy”
- Mucosal ulceration by tube migration
- Risk of occlusion of the tracheostomy tube in obese or fatigued patients
- who have difficulty extending their neck.
- Tracheoesophageal fistula formation.
- Hemorrhage.
- Late complications (Late postoperative period; more than 7 days)
- Granulomata of the trachea may cause respiratory difficulty when the tracheostomy tube is removed.
- Tracheal dilation, stenosis, persistent sinus or collapse (tracheomalacia)
- Scar formation requires revision.
- Blocked tubes may occur at any time, especially if secretions become thick, the secretions are not managed appropriately(suction), and humidification is not used.
- Hemorrhage.
Leave a Reply